Friday, June 29, 2007

Scripture Bag 2

I made another scripture bag. This one is made of black duck cloth. The other one isn't as cool as this because it doesn't have pockets to hold my stuff!

materials:
duck cloth, sewing machine

Buttons

I bought a button making machine and went crazy with pin buttons. You can stick 'em anywhere! Your clothes, your bag/backpack, and ...that's about it. These are just a few of them...

materials:
button making machine, computer (to print out designs), button making kit


Pencil Carrier 2

These are smaller versions of the pencil holder thingies. They hold about... 3-4 inch colored pencils used for my scriptures! Small and fits perfect in any bag :)

materials:
fabric, ribbon, sewing machine


Scripture Bag

It's for holding my scriptures!

materials:
duck cloth, fabric, sewing machine


Pillow Case

This is a pillow I made for Jacob on Valentine's day :) I cut strips of fabric and sewed them together. It's pretty cinchy! Use black if you want to give it a masculine look haha

materials:
fabric, sewing machine :)

Altoid Word Magnets

Have lots of these empty Altoid tins lying around? Put 'em to good use. On the right, I used sand paper to scrape off the paint and writing. I cut out words (printed on cardstock) and stuck them on adhesive magnets (bought from Wal-Mart). And there you go.

materials:
empty altoid tin, construction paper, computer, lots of words!, adhesive magnet strips (available in rolls), scissors

Film Cannister

Cut a slit on the side of an empty film cannister. Put a roll of stamps in there and tada! You have a stamp dispenser :) I even labeled it with my cheapo label maker. It's that easy.

materials:
empty film cannister, stamps, x-acto knife 

For Your Ribbons...

A place to store ribbons! My Converse shoebox. I knew this box would come in handy. Poke holes on opposite ends of shoebox and glue/tape 2 chopsticks together and put them through the ribbons' spools to hold them in place. Punch holes through the front of the shoebox to string your ribbon through!

materials:
chopsticks (or skinny wooden sticks to put spools through), shoe box, spools, hole puncher

Spool Stand

I didn't really have any "real" wood for this, so I used extra base board we had lying around. I sawed it myself! Then I carved holes and hot-glued little pieces of wooden sticks (i used chopsticks) to hold the spool in place! Be sure to sand down the sharp spots. It's no fun getting a splinter.

materials:
wood (or baseboards like I used! lol), saw (please be careful!), TONS of wooden chopsticks or a long skinny wooden pole (from Michaels), wood carving utensil, hot glue, hammer, nails, sand paper

Keep Your Sparkles

Here's a way to keep your sparkles in one place. Stick 'em in a mini water bottle! I took off the original "kirkland signature" label and made my own from a sticker maker.

Throw Pillow 2

My cousin was jealous that I had a pillow with a picture of me and my husband, so I made one of her and her boyfriend. I used her favorite colors- maroon & black.

materials:
fabric, computer, favorite picture, transfer paper (don't forget to reverse the picture before printing!), iron, pillow, zipper

For the front, I cut out stars and gave it a frayed look. For the back, I sewed strips of fabric together.

Make Envelopes

Another fun thing... make envelopes! I used old magazine paper from a Dooney & Burke catalog (these catalogs are HUGE). The pages are a little thicker than the normal magazine pages. You can also use regular magazine pages, but they are not as sturdy and cool!

materials:
colorful pages from big designer magazines or catalogs, glue (Elmer's is ideal), scissors


Pencil Carrier

Tired of using cardboard and ziploc bags to hold your pencils/colored pencils? Well, I have the solution for you! Introducing... the pencil carrier thingy!

materials:
fabric, ribbon, colored pencils! 

Throw Pillow

Same idea as label making-- print picture on transfer paper, iron onto fabric, sew the pillow case and stuff!

materials:
pillow, fabric, sewing machine, computer & printer, favorite picture, transfer paper (remember to reverse the picture/words), iron, zipper 

Make your own Labels!

Print them onto transfer paper (don't forget to reverse it), and iron them onto ribbon! Be sure to leave enough space in between each word/label for room to sew.

materials:
computer & printer, label design, iron, transfer paper

Pocket Tissue Holders

These carry those little pocket tissues! They fit in your pocket (duh), bag, etc. The inside is duck cloth/canvas to keep the tissue holder from being flimsy.

materials:
travel-size tissue (for measurements), duck cloth, fabric, sewing machine, ribbon, buttons
these are cuter

Tool Belt

My handy dandy crafty tool belt! I got tired of going back and forth from the table to the floor, grabbing scissors and pencils and glue, so i made a craft belt. I bought an apron made of canvas and cut it up, made pockets and attached the strings... and BAM! A crafty tool belt!

materials:
ready-made aprons (strings already attached) OR canvas fabric, scissors, ribbon, sewing machine

Memory Board

Using foam board, cut it in half and glue together. Wrap batting and fabric around board and glue. Glue ribbon along board and use tacks and buttons where ribbons intersect.

materials:
foam board, fabric, glue, ribbon, buttons, tacks 

You can place the board on a desk or hang it anywhere!

Carving

I've never carved anything before. Until now! I have a package with different sizes of wood blocks. This is one of the smallest ones, so I decided to carve out "love". Be sure to have the right carving tools or whatever! Not bad for a first-timer, eh?

materials:
small piece of wood, wood carving tools

Word Magnets

Print out random words (be sure you have adjectives, nouns, verbs, all that jazz). It is best to use card stock for printing. You can buy rolls of adhesive magnets at Michael's or Wal-mart. Cut out each word and glue or stick to magnet. Cut out each magnet and tada! You've created word magnets!

materials:
computer & printer, lots of words, cardstock, adhesive magnets

Tic Tac Toe

Use 2 different color buttons (about 9 buttons of both colors). Glue little magnet pieces on the bottom of the buttons. Altoid tin box is metal so magnet works great! Play in the car as you travel! But don't play and drive.

materials:
empty altoid tin, buttons (2 different colors), hot glue, small round magnets, ribbon or stickers for the tic tac toe grid

Curtains!

Sometimes, blinds just aren't enough!

materials:
duck cloth, fabric, sewing machine


I sewed straps on each panel so I would be able to tie them on sunny days

Tired of Gingerbread men?

Turn the gingerbread person upside down and make a bunny! I didn't want to be like the other kids with their gingerbread men... lol other kids. 

Need To Find A Place To Put Your Ugly Buttons?

This is a canvas tote bag cut in half to make a handbag. I hot-glued all those buttons. I recommend sewing them on as well... otherwise you'll lose your buttons! Not good. :(

materials:
canvas tote bag, scissors, buttons, hot glue

Jean/Denim Quilt 2 (bigger and better!)

Jacob and I combined our jeans and even bought some ginormous jeans from Goodwill to make this huge quilt. I wanted to give it the frayed look so I did the sewing and cutting on the outside. This quilt is perfect for a queen or king size bed. Can you see the design/pattern we made?? *It helps if you have different shades of blue jeans! :D

materials:
sewing machine (we broke 2 needles during this project! i suggest a strong sewing needle!), sharp scissors, tons of old/unused jeans, fabric or bedsheet (to put on back)
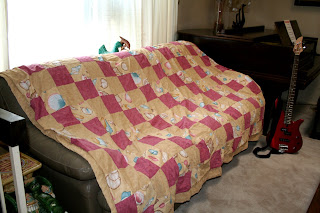
This picture of Jacob and the quilt was taken before we sewed on the back side


the backside of the quilt matches with our pillows

Jean/Denim Quilt 1

An older jean quilt I made in 2004. It's pretty small. Maybe good for a twin size bed. Or a throw blanket

materials:
old/unused jeans, sharp scissors, sewing machine, batting, fabric (you can by fabric with batting attached to it... which is what I did!)


Create Your Own Mug

Jacob and I bought these plain mugs from Michael's (the craft store). The little package came with special markers specifically used for mug coloring. These mugs are NOT microwavable (sucks), but they make great pencil holders!

Seashell Quilt

I made 7 or 8 inch squares for this blanket. It took me longer to make because I had to go back and forth to the store for more fabric!

materials:
sewing machine, batting, fabric

Jacobs Quilt

This is a quilt I made back in 2003 late August. It only took me a 1 1/2 weeks to make. I was in a hurry and wanted to get in done before he left for his mission :)

materials:
sewing machine, fabric, batting