Thursday, January 5, 2012

Tinted Mason Jars

materials:
food coloring, mod podge (gloss/lustre -do not use matte), clean mason jar or any type of recycled glass jar (you can use small pickle jars or sauce jars, some water, ramekins,
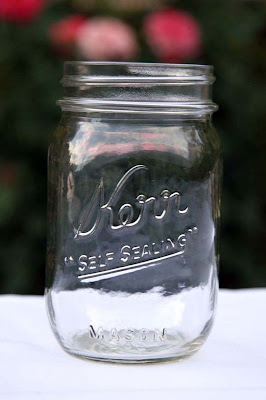
Above is the original look of the mason jar. Mix your choice of food coloring with about 1 TBSP of water in a small bowl or ramekin. I used 2 drops of blue and 1 drop of green food coloring. Then in the jar, drop about a quarter size or 1 TBSP of mod podge (better to use gloss/lustre rather than matte!). Pour food coloring mix into jar and stir until mod podge and coloring is mixed well.

Turn the jar until you have the entire inside covered with the mod podge mix. Empty excess into a bowl. Place on foil or wax paper on a sheet and bake at lowest temperature (mine was 170 degrees). Bake for about 20-30 minutes. Turn upside down after the first 10-15 minutes (or whenever you think it's ready to be flipped).

TADA!


Monday, December 26, 2011

Wood-burned Spoons

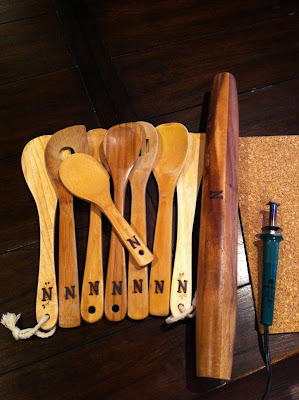
I wood-burned all my wooden spoons, as well as my rolling pin. I burned my last name initial as you can see :)

I know there's no need to really "label" anything since I know it belongs to me lol , but it was fun doing this!

materials:
wood burner, wood burn stamps (letters), wooden spoons

Thursday, December 22, 2011

I Love You Because


Created on photoshop. Used several different fonts for each word and used white shadow behind "love". I printed this 5x7 at Costco and bought the frame from HomeGoods. Use a dry-erase marker to write whatever you want to your significant other!

materials:
frame, photo or cardstock with "i love you because", dry erase marker

Monday, December 21, 2009

Quilt

I made this quilt for my best friend Justine. It took me a day to cut the pieces and another day to sew it all together! --I was determined to finish it :) I cut 3 long rectangular pieces (different widths), which make a square when sewn together. Each square is about 12-18 inches by 12-18 inches! I can't remember! Anyway, I made it 4 squares across and 5 squares down. On the back is a quilted fabric with batting attached to it, which I sewed on each side and then tied in every corner with yarn.. The pictures aren't as good as the real deal! That is Justine holding up the blanket :)

materials
8-10 different fabric designs, scissors, sewing machine, embroidery/quilting needle, yarn

Monday, November 2, 2009

Corkboard Coasters

Inspired by drinking in the office. Drinking water, of course! :) I made these for my cubemates (my friends). Since we spend our ENTIRE day in the office, we DO need SOMEthing to keep us going through the day! Unfortunately, drinks perspire and get our desks wet. I've found the solution! ...Well, a decorative* solution ;) I measured out each cork to be 4 in x 4 in. This is a good size for a coaster!

materials:
corkboard, scissors (to cut corkboard if necessary), ruler, wood burner tool, your imagination for design!

Thursday, September 10, 2009

Clay Day

Last weekend, I spent my day making things out of clay! Hey-- that rhymes! Here's what I made: 2 kitties, cow, piggy, mushroom, frog, tree, ...and well, that is suppose to be an orange cat. Shouldn't have put those black whiskers on him! Oh well...

materials:
Sculpey clay, toothpicks, clay tools, white board (to keep your desktop clean), oven for baking!


Monday, July 20, 2009

Squid

This was a fun project! 

materials:
crocheting yarn, crochet needle, batting

Friday, July 17, 2009

Quite A Pear...

My mama and I spend the day together crocheting. I used to know how, but it's been so long, I needed to brush up on my crocheting! She taught me what 'sc' and 'dec' and 'inc' and 'ss' meant! Craziness. Anyway, here are a pair of pears! She made the dark green and I made the light one.

materials:
crocheting yarn, crocheting needle, batting, round bead things for eyes, embroidery floss (to tie on eyes), embroidery needle (the plastic kind)

Sunday, June 21, 2009

Retro Gaming

Another clay project... 

materials:
Sculpey polymer clay, clay tools, oven for baking


Friday, February 20, 2009

Love Monsters


Here are a couple of monsters fit for Valentine's Day. My co-workers helped me come up with this idea of using felt in colors of conversation hearts (that i failed to make) and making these love monsters! Well my friend at work ended up buying a couple of monsters from me! I was so happy that someone appreciated it enough to buy it! :) Thanks Shaundra

materials:
felt, scissors, sewing machine, batting

Wild Thing

Vampire


Sunday, November 2, 2008

iPhone Case

Here are a couple of iPhone cases that I hand-stitched! Not very easy when you're doing it by hand!

materials:
felt, embroidery floss, embroidery needle, snap button and your hands!


Thursday, October 23, 2008

More Clay Magnets lol

Here are two more that I made. A hot dog and another hamburger, but this time it's with cheese! ...I guess you would call that a cheeseburger.. haha, whatever! 

materials:
Sculpey polymer clay, clay tools, oven for baking


Tuesday, October 14, 2008

Clay Magnets!

Alrighty, my latest obsession are polymer clay magnets. I was at work, staring at my shelf and realized I didn't have enough magnets. Keep in mind I have TONS of The Office magnets... but not enough '3d' magnets... so I decided to make a magnet. Then I thought, "why don't I make a magnet for all my co-workers on my team??". So I did! Each magnet represents them, according to what I think ;) 

materials:
Sculpey polymer clay, clay sculpting tools, oven for baking, glaze, magnets, hot glue


Sunday, October 5, 2008

MY own California Roll

So I was browsing the web yesterday and I decided I wanted something to put my iphone in. Jacob has a clear case... but I wanted more than just a case! So I found this on griffintechnology.com. It is called the California Roll. It's a case for your ipod/iphone, headphones, and usb cord thingy. This costs 20 bucks on Griffin and I wasn't wanting to spend that much for a case that I can make myself! So Jacob and I went to JoAnn's crafts to buy a few things. We went to my grandma's house where all my cousins were, and I started making my pattern! I gave MY california roll a twist and put an extra pocket (for cash)! There are a total of 4 pockets if you can see. One cash pocket, one credit card pocket, one iphone pocket, and one earphone pocket! Here it is!

materials:
duck cloth (that's the fabric), elastic band, sewing machine, double wide black border,
thin, but strong plastic you can sew (the kind you see in wallets for your driver's license or the kind that is used to cover up the cheap pocket calendars)! haha


The great thing about the clear plastic is that you can still use the touch pad without having to push hard. It's great!